Forms
- Basara
There are 2 types of forms in AbanteCart, FlexyForms and standards forms. Both forms are using the same classes to draw the form and HTML elements. Main difference between the two is that FlexyForms are loaded from the data base automatically with LoadFormDB() function.
Working with Forms
Standard form is build in the code and FlexyForms are mainly used in storefront to provide flexibility to cart admin to edit fields, add new forms, and also ability to extend forms/fields with extensions. In AbanteCart control panel we use standard forms, but blended with FlexyForms. Since control panel mainly consists of forms, it will be heavy load to provide database driven forms. FlexyForms approach in the control panel gives ability to add (extend) fields to the forms with added extensions.
There are 3 types of field sets that are used in AbanteCart. These types are based on the way fields respond to changes. Standard type - On fields changes, no changes are highlighted. This is a standard most known fields that are used in allwebsite. In AbanteCart these fields are used in storefront, and for search and non-update related fields in control panel. Highlight on change - These fields will change color once you change the value in the fields. They will change back the color if you change the value back to original. This is very helpful in UI to show users that data was changed and requires attention or saving.
Highlight and save - These fields will not only change color, but will also show the option to save or reset the value. Changed field can be saved individually right after edit, or if change in accident. it can be reset. This is very handy in the areas with big forms and improve user experience and user error.
Extending and Creating FlexyForms
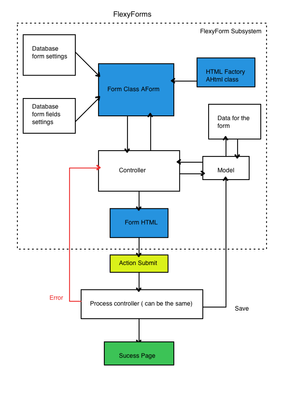
FlexyForm set up consists of 3 important components: Database entry, Processing Controller and Template. Below is a diagram that can give more idea how FlexyForms are structured:
Lets look into Controller and PHP code Create an instance of the class AForm:
$this->form = new AForm('testForm');
testForm -> Form Name and ID that needs to be unique Now we need to load this from data to the form instance from the database. We assume we already have it in there. We explain later how to add form to the database.
$this->form->loadFromDb('testForm');
Since we have all the form data, fields and settings for the form loaded from the database, we are ready to generate FlexyForm code and pass to the template to be displayed.
To display form you just pass output of getFormHtml() function:
$this->view->assign('form_output', $this->form->getFormHtml() );
'form_output' is the name of variable in the template to display the form’s HTML
Run the form template or any other template to display the form:
$this->processTemplate('pages/index/form.tpl' );
Validation:
At some point you need to add validation code to check submitted values of the form.
You can see example below how this can be done:
if ( $this->request->server['REQUEST_METHOD'] == 'POST' ) {
        	if ( $this->validateForm() ) {
            	//this message should be loaded from language file
            	$this->session->data['success'] = 'Success';
            	$f = $this->form->getForm();
		//success_page can be set for the for in the database.
            		$this->redirect($this->html->getSecureURL($f['success_page']));
        	} else {
            		$this->form->setErrors($this->errors);
            		$this->form->batchAssign($this->request->post);
        	}
    	}
Validation function is pretty simple In sample case we just check if all required fields filled. You can easily extend this function to meet your needs.
private function validateForm() {

    $this->errors = array();
    $fields = $this->form->getFields();
    foreach( $fields as $name => $data) {
   	 if ( $data['required'] == 'Y' && empty($this->request->post[$name]) ) {
   		 $this->errors[$name] = 'This field is required';
   	 }
    }

    if ( !empty($this->errors) ) {
   	 return false;
    } else {
   	 return true;
    }
}
To assign values to form fields you can call 2 methods assign() and batchAssign().
Here is an example how it is done:
$this->form->assign( 'field_name',  'field_value' )
$this->form->batchAssign( array(
'field_name' => 'field_value',
'field_name' => 'field_value',
'field_name' => 'field_value',
 ) )
If you have multiselect field or checkbox group field, you need to pass an array.
$this->form->assign( 'field_name', array(‘value1’, ‘value2’..., ‘valueN’) )
Now let’s look in the template that actually contains the code to displays the form. In the template you need to include the form output in the place you need form to show:
<div class="from_wrapper">
    <?php echo $form_out; ?>
  </div>
Form CSS style will be based on the standard style set in the AbanteCart. You can modify the style by including your own CSS. To modify: Locate original CSS for the form in appropriate stylesheet location for admin or storefront.
In some browsers (Firefox with Firebug or Safari) you can use feature to inspect HTML elements. This is very handy to understand how CSS and HTML structured on the pages.
To add your own styles you can include CSS:
$this->document->addStyle("path/to/css");
It is very recommended that you add this only to your extension or create extension. If you change CSS file in original location it might be replaced at your next upgrade or in some cases upgrade might fail.
You are now done with building the form code and display of the form
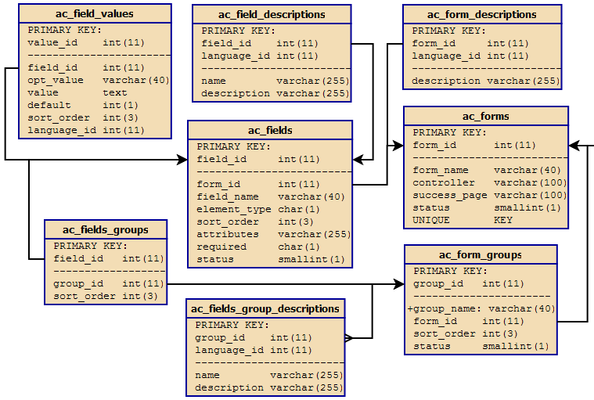
Now you need to set fields to the database. You can use different methods to set and save form settings and fields to the database. There is a traditional SQL inserts or updates that can be used. We have following tables that needs to be used to manage forms data:
In addition to traditional SQL method we offer a convenience of build in functions in the library to simplify adding, deleting or editing FlexyForms database. These can be used for extension install and uninstall process and in the control panel to manage FlexyForm settings.
Example of xml file for form loading:
<?xml version="1.0" encoding="UTF-8"?>
    <forms>
   	 <form>
   		 <action></action>
   		 <form_name>some form</form_name>
   		 <controller>testcase/testcase</controller>
   		 <success_page>/pages/testcase/success</success_page>
   		 <status>active</status>
   		 <form_descriptions>
   			 <form_description>
   				 <language>english</language>
   				 <description>some form for loading by XML-load</description>
   			 </form_description>
   		 </form_descriptions>
   		 <fields>
   			 <field>
   				 <action></action>
   				 <field_name>fld_name</field_name>
   				 <element_type>I</element_type>
   				 <sort_order>1</sort_order>
   				 <attributes>onclick="alert('some alert text!!!')"</attributes>
   				 <required>Y</required>
   				 <status>1</status>
   				 <field_descriptions>
   					 <field_description>
   						 <language>english</language>
   						 <name>some input</name>
   						 <description>some description</description>
   					 </field_description>
   				 </field_descriptions>
   			 </field>
   			 <field_groups>
   				 <field_group>
   					 <action>insert</action>
   					 <name>Some field group name</name>
   					 <sort_order>2</sort_order>
   					 <status>1</status>
   					 <field_group_descriptions>
   						 <field_group_description>
   							 <language>english</language>
   							 <name>some field group</name>
   							 <description>some description</description>
   						 </field_group_description>
   					 </field_group_descriptions>
   					 <fields>
   			   		     <field>
   						      <action></action>
   						      <field_name>input in group</field_name>
   						      <element_type>I</element_type>
   						      <sort_order>1</sort_order>
   						      <attribues></attribues>
   						      <required>Y</required>
   						      <status>1</status>
   					     <field_descriptions>
   					 	 <field_description>
   						    <language>english</language>
   						    <name>some input in group</name>
   						    <description>somedescription</description>
   								 </field_description>
   					      </field_descriptions>
   					   </field>
   					   <field>
   							 <action>insert</action>
   							 <field_name>some select</field_name>
   							 <element_type>S</element_type>
   							 <sort_order>2</sort_order>
   							 <attribues></attribues>
   							 <required>Y</required>
   							 <status>1</status>
   							 <field_values>
   								 <field_value>
   									 <language>english</language>
   									 <opt_value>1</opt_value>
   									 <value>select me 1</value>
   									 <default>0</default>
   									 <sort_order>1</sort_order>
   								 </field_value>
   								 <field_value>
   									 <language>english</language>
   									 <opt_value>2</opt_value>
   									 <value>select me 2</value>
   									 <default>1</default>
   									 <sort_order>2</sort_order>
   								 </field_value>
   								 <field_value>
   									 <language>english</language>
   									 <opt_value>3</opt_value>
   									 <value>select me 3</value>
   									 <default>0</default>
   									 <sort_order>3</sort_order>
   								 </field_value>
   							 </field_values>
   						 </field>
   					 </fields>
   				 </field_group>
   			 </field_groups>
   		 </fields>
   	 </form>
    </forms>
Create or Extend Standard Form with AForm Class
AbanteCart offers unified methods to create forms and load HTML form elements such as form data and fields. There are 2 main classes AForm and AHtml that are inter-connected to give better control and flexibility of the form.
To create a form you need to create an instance of class AForm and continue with using methods.
$form = new AForm();
	//Set the form
        	$form->setForm( array(
                	'form_name' => 'example_form_name',
        	));
	//Set form name and id
    	$form_data['example_form']['id'] = 'example_form_name';
	//Create a form open tag
    	$form_data['example_form']['form_open'] = $form->getFieldHtml(array(
                	'type' => 'form',
                	'name' => 'example_form_name',
                	'action' => '',
        	));
    	$form_data['example_form']['submit'] = $form->getFieldHtml(array(
                	'type' => 'button',
                	'name' => 'submit',
                	'text' => $this->language->get('button_go'),
                	'style' => 'button5',
        	));

$this->view->batchAssign( $form_data );
$this->processTemplate('pages/example.tpl' );
To set selected value for the selectbox, checkboxgroup and multiselect elements, for example, you need to pass options array with available options to select and you can pass “value” parameter (as selected value(s) ) that can be singe value or array;
$this->form->getFieldHtml(array(
 		'type' => 'selectbox',
 		'name' => 'multiple',
 	'options' => array( 1=>'1', 2=>'2', 3=>'3'),
 	'value' => 1,
	));
$this->form->getFieldHtml(array(
 		'type' => 'multipleselectbox',
 		'name' => 'multiple',
 		'options' => array( 1=>'1', 2=>'2', 3=>'3'),
 		'value' => array(1=>1, 2=>2),
	));
Available field types as part of AForm class: input, textarea, selectbox, multiselectbox, radio, checkbox, checkboxgroup, file, and hidden
Available methods as part of AHtml class:
getURL($rt, $params = '')
getSecureURL($rt, $params = '')
getSEOURL($rt, $params = '')
getCatalogURL($rt, $params = '')
getImagePath()
buildElement($data)
buildHidden($data)
buildInput($data)
buildPassword($data)
buildPasswordset($data)
buildSelectbox($data)
buildMultiselectbox($data)
buildTextarea($data)
buildCheckbox($data)
buildCheckboxGroup($data)
buildFile($data)
buildButton($data)
buildForm($data)
buildCaptcha($data)
You can build HTML element via Form object Reference or via html object methods
string  $form->getFieldHtml( array(
   	 	'type' => 'input',
   	 	'name' => 'field_name',
   	 	'value' => 'field_value',
    	));
string  $this->html->buildInput( array(
   	 	'name' => 'field_name',
   	 	'value' => 'field_value',
    	));
string  $this->html->buildElement( array(
   	 	'type' => 'input',
   	 	'name' => 'field_name',
   	 	'value' => 'field_value',
    	));
$form->getFieldHtml(array(
    'type' => 'button',
    'name' => 'submit',
    'text' => ‘button_save’,
    'style' => 'button1',
));
$form->getFieldHtml(array(
    'type' => 'selectbox',
    'name' => 'manufacturer_id',
    'value' => 'manufacturer_id',
    'options' => array(
option_value => option_text,
option_value => option_text,
option_value => option_text,
    ),
))
Extend Standard Forms
To extend or add fields to standard form you need to create FlexyForm entry with the same form name. You need to add to FlexyForm all new (additional) fields that you need to be added to the form. These additional fields will be loaded at the end of the form with method loadExtendedFields().
Each standard form code should have this call to allow extensions to add fields to the form:
$this->form->loadExtendedFields('testFrm');
Example how to add extended fields from FlexyForm to standard form:
$this->form = new AForm();
// Standard form code
...
$this->form->loadFromDb('testFrm');
$extended_fields = $this->form->loadExtendedFields();
$this->view->assign('extended_fields', $extended_fields);
In the template you need to add code below within the form scope:
<?php echo $extended_fields ?>
</form>