Multi-store
- Basara
- Pavel Rojkov
Go to System → Settings → Store
- one back-end to manage all stores
- use different templates on each store
- display different products/categories on each storefront
- display different blocks, banners... layout
- localize each store by setting a different default language, currency.
- setting different shipping and payment methods.
To create a multi-store you DON’T NEED to install a cart again or anything do with files.
Before deciding to enable the multistore determine how do you want customers to visit the second store based on the following options: one level below the primary domain, different domains or each store will have its own subdomain.
The easiest approach will be one level below the primary domain (Using subfolders: https://example.com/cars/). In order to create multiple online stores with this approach you do not need to perform domain setup. Please skip the Domain configuration step in this case.
1. Domain configuration: setup additional domain (addon domain) or the sub-domain in your hosting provider admin panel
2. AbanteCart configuration: set up the second store in the admin panel.
Note
Please note that only the default store may contain the www. in the URL! Other stores should not include www.
Step 1: Set up Domain in your hosting cPanel
this step is not AbanteCart related. If you have problems please contact your hosting provider support to help you to set up the new domain or subdomain
This step is required in case second store(s) are set up as subdomains of the same domain (https://cars.example.com/), or have entirely different domains(https://www.carsdomain.com/). Please skip this step if your store is one level below the main store.
Important to make sure that the second domain is routed to the correct folder.
There are several ways in cPanel - subdomain or addon domain.
Example for sub-domain setup
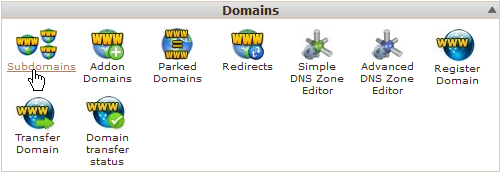
In your cPanel click on the sub-domains icon
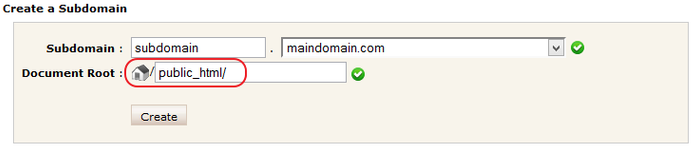
Create a sub-domain. Document Root must be the same as the default domain!
If AbanteCart installed not in root folder.
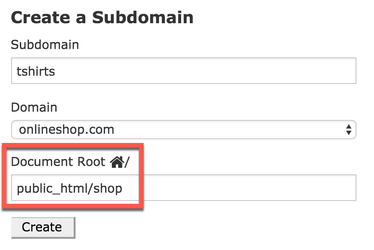
Make sure the document root is the same after the subdomain is created!
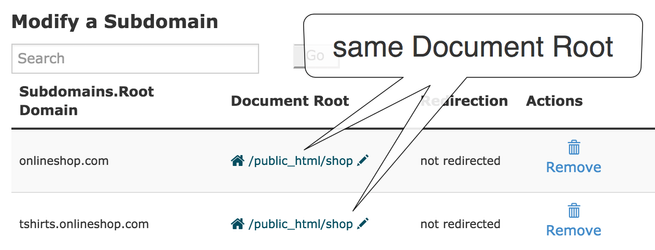
important!
Document Root value should be the same as the main domain! If you have AbanteCart installed in some folder for example /public_html/shop/, the new Subdomain Root should have the same path.
Anyway, a lot of beginners have issues with this step because:
- Due to DNS propagation, the sub-domain can take up to 24 hours and more to start working
- make sure to link the sub-domain to the path where the default store was installed to. The Document Root is the same in the default store and the new domain/subdomain
- make sure there is no redirection set up for new subdomain/domain
- usually, the user may need to clear browser cache and DNS cache on the local computer to resolve new or reconfigured domains/subdomains
- also, possible some settings in the .htaccess file or file permissions issue prevent correct work
Please contact with hosting service provider to make sure your domain/subdomain is configured correctly.
Step 2: Create Store in your AbanteCart admin panel
To add a new shop, find in AbanteCart admin System → Settings page and click on the Create New Store button
You’ll be taken to a new screen with the following fields:
Status: Turn it On to enable store.
Store Name: The name of your store or business.
Store URL: Include the full URL to your store. Make sure to add '/' at the end. Example: https://cars.yourdomain.com/ or https://maindomain.com/cars/
single domain note
If you need to use a subdomain like store1.domain.com as an additional store, please make sure your main store use the subdomain www or any in the settings (example: www.domain.com) If you use domain.com as the main store, it will work as *.domain.com and other stores cannot use the same domain.
How to delete store
in AbanteCart admin go to System → Settings select store in the Edit Settings: drop-down, click Edit Store button
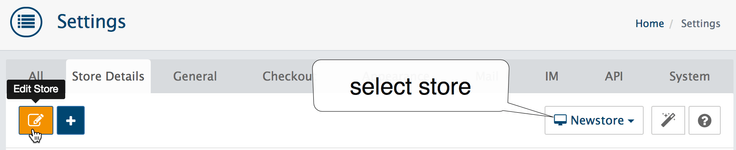
the trash bin icon appears, click on it to completely remove a store

Related content
AbanteCart, all rights reserved. 2025 ©