Forms Manager

Forms Manager

Go to the Design → Forms Manager

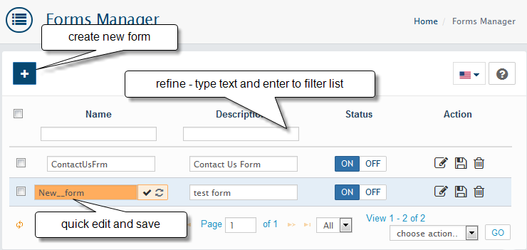
The Forms Manager extension provides powerful tools to customize and manage all customer data input forms within your AbanteCart store. You can edit existing system forms or create new custom forms with various field types, validation rules, and structural groups.

form-manager.png

Core Forms Now Managed

Most critical customer-facing forms are accessible and customizable via the Forms Manager. These system forms are often interconnected to ensure a consistent customer data experience.

System Form Example

Purpose

Interconnection Note

Customer Registration Form

Captures new user details and address.

Fields like country_id transfer their data to the Customer Address Form after successful registration. The Phone Number, First name etc, are present in the Customer Details Form

Customer Details Form

Allows logged-in users to update personal data.


Customer Address Form

Manages a logged-in user's billing/shipping addresses.


Guest Address and Details Form

Used for checkout when a customer does not register.


Contact Us Form (Default)

Standard site contact form.


Default forms

Do not rename or change the Processing Controller or SuccessPage to avoid breaking site links.

That's an excellent way to illustrate the concept of form interconnection and field consistency. I will update the "Interconnection Note" and "Field Customization" section of the Forms Manager rewrite to include this example.

Interconnection Example: Collecting VAT ID

If you need to collect a new piece of information, such as a VAT ID, you must ensure the corresponding field is present in all relevant forms to maintain data consistency:

  1. Add a new custom field with the same Field ID (e.g., vat_id) to the:

    • Customer Registration Form

    • Guest Address and Details Form

    • Customer Address Form (if necessary for editing existing addresses)

  2. Apply identical settings across all these forms. For example, to ensure the VAT ID meets required length constraints, set the same Regular Expression Pattern for all vat_id fields:

    • Regex Pattern: /^.{8,14}$/u The input must be between 8 and 14 characters long (letters, numbers, spaces, symbols).


Field Customization and System Integrity

To ensure system stability, certain default field properties are locked, but essential display and validation properties are fully customizable:

Locked Properties (Cannot be Changed)

Customizable Properties (Can be Changed)

Field ID (e.g., country_id, firstname)

Display Name (The label seen by customers)

Field Status (e.g., whether it is active/enabled)

Validation Error Text

Can not be removed

Validation via Regular Expression Pattern (Regex)


HTML Attributes and Icon


You can also set fields to be Required, forcing customers to provide input before submitting the form.


Creating and Configuring Custom Forms

General Form Settings Example

Setting

Purpose and Default Behavior

Form Name

The name as it appears in the Admin panel.

Description

The description

Processing Controller

Select Default Email. The submitted form data will be emailed to your store's primary email address.

Success Page

The URL the customer is redirected to after successful submission. If left empty, it uses the default value: forms_manager/default_email/success.

To configure Default Sender and Default Sender Email, go to Admin → Extensions → All extensions → Forms Manager extension.
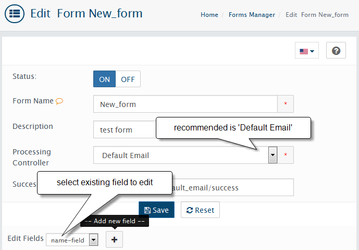
contact-us.png


Form Name: The form name as it will appear on the admin front.

Description: as it will appear in the front-end.

Processing Controller: select Default Email. Submitted forms will be emailed to your store email

Success page: Leave it empty if you want to redirect to the same page as the controller.

Default value forms_manager/default_email/success 


Field Types and Details

You can add a wide range of input field types. After adding a new field, set its details, pre-defined values, and validation rules.


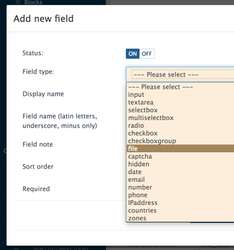
When using the File Upload field type, you have additional, non-required settings

file type

When setting up the "file upload" field type, you'll see additional non-required settings:

Allowed Extensions are file extensions (ex.: png) that are allowed for upload. Several extensions may be separated with a comma.

Min/Max Size - min/max allowed file size in Kb.

Upload Directory - directory where uploaded files will be saved. Your directory will be created in /admin/system/uploads. If you leave this field empty, files will be uploaded to the default directory.

field-types.png


Regular Expression (Regex) Validation

To limit the kind of input users can provide (e.g., only numbers, specific date formats, or name formats), use the Regular Expression Pattern setting.

  • Example Regex: To match the initials of names that are in uppercase and are quite long (e.g., "Boris Johnson"): /^([A-Z]{1}[a-z]{1,}\s)([A-Z]{1}[a-z]{1,}\s?)+$/
  • Example Phone Regex: to accept most phone formats /^[+\- 0-9\(\)]+$/

HTML Attributes

The html-attributes setting allows you to add custom HTML attributes to your form fields for browser functionality, specific styling, or integration with external scripts. This is vital for improving accessibility and user experience, especially on mobile devices.

You can add standard attributes like maxlength, as well as custom attributes (e.g., data-pair-with).

To add multiple attributes, list them separated by a space.

Field Example

Attribute Configuration

Purpose

Phone Number

maxlength="32" autocomplete="tel"

Sets the maximum input length and signals the browser to offer saved phone numbers for auto-fill.

Email Address

minlength="1" maxlength="96" autocomplete="email"

Enforces length restrictions and signals the browser to offer saved email addresses.

First Name

minlength="1" maxlength="32" autocomplete="given-name"

Enforces length restrictions and assists with browser auto-fill.

Custom Attribute

data-some-attribute="some value"

Adds a custom data attribute for use with JavaScript or custom styling.

Country

autocomplete="country"


Organizing Fields with Form Groups

You have the ability to create Form Groups to organize fields under specific blocks or headings, improving form clarity for the customer.

For example, the Registration Form can be logically separated into groups like:

  • Your Personal Details

  • Your Address

  • Login Details

  • Newsletter

form-groups.png

How to Create/Edit Form Groups:

  1. Go to Design → Forms Manager and click the Edit button for the desired form (e.g., Customer Registration Form).

  2. Click on the Groups tab.

  3. Here you can create new groups and define their Sort Order to control the display sequence.

  4. After creating groups, select a group for each field or navigate back to the Fields tab and assign existing fields to the appropriate group.


How to display a new form in the storefront

This process is only necessary for custom-created forms (like a new survey or custom request form), not for core system forms like Registration or Contact Us.

  1. Create the Form: Ensure your form is configured correctly under Design → Forms Manager. It is crucial to ensure two settings are valid before proceeding:

    • Processing Controller: Select a valid controller (e.g., Default Email if you want the submissions emailed to you).

    • Success Page: Provide a valid path like (forms_manager/default_email or content/contact/success) where the customer should be redirected after the form is successfully submitted.

  2. Create a Form Block: Go to Design → Blocks and click the + Insert button. Select the Forms block tab and choose your newly created form to embed it into a display block.

  3. Add Block to Layout: Go to Design → Layouts. Select the page layout where you want the form to appear (e.g., the Information page layout) and add the created Form Block to the desired column/position.

AbanteCart, all rights reserved. 2025 ©